mama

The second movie I’ve worked on is out soon. It’s called Mama, and trust me, the trailer does not show even a corner of the creepiness.

Without giving too much away, I worked on an important shot during the climax of the film, and I rigged Mama’s hair.
Tags: ,

spline IK overshoots

I’m constantly attempting new setups in rigging. Usually this is out of necessity, such as when current scripted setups don’t behave reliably or deliver the desired result with new models. Other attempts are me exploring things about my setups with which I’m not one hundred percent satisfied. I’ll keep doing research until I find a setup that works as I feel it should in the majority of situations, stably and predictably.

Stretchy Spline IK is something I’ve never liked because of the way its chains overshoot the end of the curve when the spline’s curvature is too great. I’ve never worked in a studio that had its own custom Spline IK solver, where this problem is non-existent, so I research solutions whenever I hit the issues that stretchy splines always bring.

Recently I had a thought about using live sub-curves of a spline (using the Maya subCurve node). I’ve always figured that the overshoots are due to floating point rounding and the fact that measuring a nurbs curve is an inexact science; curves are sub-samples a few thousand times, and the distances between points are summed.

(Before you ask, I use splines because they’re easy and light when you need to be able to lock a chain to a minimum or maximum length, but still allow stretching. I have not found a fast way of doing the same using a nurbs ribbon.)

I wrote a custom node to extract sub-curves by length along the original curve (using MFnNurbsCurve::findParamFromLength), then attached joints to each subCurve with Spline IK. I figured that sub-curves made by length would lock each joint in place, and that somehow this would work around the overshoot issue.

Boy was I wrong.

Turns out the assumption I’ve had for a while– the same assumption I’ve heard from other riggers– was itself incorrect. It’s not that the lengths aren’t being measured accurately enough, but that as the spline curves in on itself, the effective lengths of bones on it should shrink because the bones can’t bend to match. Obvious in hindsight, but it caught me by surprise. It’s like Manhattan Distance: in Euclidean space you may only be two kilometers from that pizzeria you love, but you end up walking three kilometers to get there because Euclidean distance doesn’t take into account the fact that we can’t pass through buildings. (Or: that sewers are winding and not always as easy to traverse as the city streets for your average turtle.)

On the up side I can think of a few good uses for the sub-curve node I made, so the experiment wasn’t a total loss. I also have a few ideas of how to use the curvature of the driving spline to come up with a scale value, meaning I have new experiments to carry out.

The test proved to me again that it never hurts to pull apart an established method in an attempt to do it better. “White belt mind,” a teacher of mine used to say– try to never lose that initial state we all have when we begin something new and are constantly trying to learn.

Tags: , ,

normals display in blender 2.6x

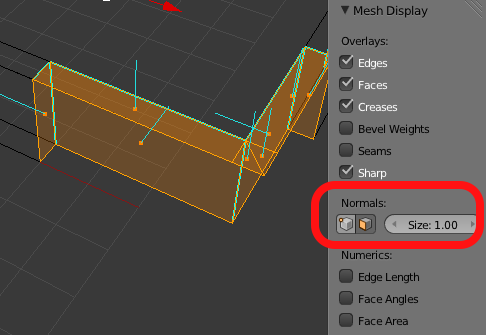
I was working on a simple mesh in Unity in Blender 2.65a and I could not for the life of me remember how to show normals (to find some flipped normals that were causing faces to show improperly). Some spots say that the normals are displayable from the N-Key panel in the 3D view, but I thought a more concrete bit of information in order.

First, the normals are only displayed in edit mode. While in edit mode, if you mouse over the 3D viewport and then press the N-Key, you should see buttons appear in the N-Key panel under the Mesh Display category. Pressing one of those buttons will either show vertex normals or face normals, respectively.

The Mesh Display buttons that appear in edit mode.

Nice thing about Unity is how it updates; I love that saving over an old FBX file will replace every instance of the mesh in scene prefabs, provided you haven’t done anything wacky. One save and all the normals get set to where they need to be. Not to mention, the Unity 4.0 interface upgrades are a great addition!

Tags: , , ,

resident evil: retribution

As some of you may know, I’ve been working on RE:5 for a while now. I’ve done rigging, character finaling, and even character effects; some of the shots include things I’ve worked on directly. You’ll be able to see the rest of my contributions when the movie comes out in September.

It’s my first film, so I don’t mind saying that I’m really excited to see my name in the credits. ^_^

maya hotkeys for Blender 2.61

Rigging Dojo Link! The interest was in the Maya hotkeys for Blender. It’s funny because earlier in the week I had a discussion with a coworker about how hard learning Blender is for users of other software.

I’ve had a newer version put together by the wonderful and talented Rob Garlington sitting in my inbox for the past few months, but between moving across town, starting a new job, and getting engaged, I’ve been very lax in blog updates. For the interested, I’ve posted his updated file here:


Blender2MayaHotkeys_2.61.zip


It’s a shame that Rob’s setup can’t be added to the main Blender distribution; I think that having “familiar” hotkeys and navigation would go a long way towards swaying users of other packages to give Blender a try and show them that integrating it into any pipeline has its benefits. (I put quotes around “familiar” because the only software I’ve been using longer than Blender is Lightwave, so Blender’s hotkey setup has always made sense to me.)

The following are Rob’s installation notes.


Install (Note this has only been tested on Windows 7)

Full Functionality Install: (to fully take advantage of the keymap changes)

  1. Start Blender and open the ‘startup.blend’ file included in the ‘Blender2MayaHotkeys_2.61.zip\config’ folder. Then go to ‘file/save user settings’ (or press ctrl + U) to save this file as the default scene, then close Blender. (This will setup a special directory under your ‘Users’ folder.)
  2. Go to the folder C:\Users\’your name’\AppData\Roaming\Blender Foundation\Blender\2.61 (note that the ‘AppData’ directory may be hidden, but it is there nonetheless and you’ll need to unhide it). Extract the contents of the Blender2MayaHotkeys_2.61.zip archive into the 2.61 folder (overwrite files as necessary).
  3. Open Blender again and it should all be setup. To ensure it’s working, if you go to the ‘Input’ tab under ‘file/user preferences’ you should see that ‘Maya Advanced’ is loaded into the filter section.

Partial Functionality Install: (Some mouse selection features are missing with this method)

  1. Simply open the startup.blend included in the ‘Blender2MayaHotkeys_2.61.zip\config’ folder. Then go to ‘file/save user settings’ to save the scene as the default.

man has it been a while

Strange how you can blink and six months pass. A lot has happened but I wake up daily wondering how it became 2012 and where I was when 2011 decided to forever sleep.

Oh right: I was in Simcoe, in front of a fireplace, with a glass of champagne. The drive out there was brutal: a slush storm hit complete with fog, and the road felt more like one going through Twin Peaks than through rural Ontario. We made it in safely, however, and got some much-needed rest.

Also managed to finish Super Mario Bros. 3 on Holly’s old NES. I swear she has the only working original style machine around (not a top-loading NES 2), and the authenticity was not lost on me even though Mario was about five inches tall on the 42″ screen. There is video. I’m still considering sending it in to Nintendo power.

I’ve been reading a lot lately on the topic of game design, and playing through SMB3 with an eye towards learning was very instructive. I marvel at how much the true game trailblazers had figured out on their first few projects. If you read similar blogs to myself you may have seen the Iwata Asks on Zelda 1 [link] or the follow up here [link]. Highly entertaining. I can’t believe that the second quest only exists because the dungeon designer mistakenly used half the available RAM.

I find most modern games don’t have the same attention to gameplay detail that those old ones did. There are the odd gems, like Arkham City, which wrap tried-and-true mechanics in a fully-realized virtual landscape, but more often than not I find myself either annoyed by a mechanic that seems thrown in for marketing or was not considered in conjunction with other mechanics, or the lack of clear goals.

Anyway, I also bought a 3DS and I’m thinking to play through a cross-section of games I’ve never tried and games I loved from the old 8-bit platforms as a learning experience. (Side note: Super Mario 3D may be the best Mario game ever made, and is a shining example of old lessons and mechanics applied to new dimensions and technology.)

The bad news from the past little while is that I dropped my MacBook Pro so I am currently without a home machine. Apple can’t get it fixed with anything resembling a quick turnaround, which led me to two decisions: First, forget Applecare. It’s a waste of money in situations where you need repairs done quickly. The company has made it pretty clear where they sit with professional users. Remember ProCare? It’s not even offered any more. Second decision: buy a second laptop from a company that understands some customers need things to happen on their schedules. I have a Lenovo W-series machine on the way with way better specs than my MacBook and an anti-glare screen in the resolution I want plus three years of next business day support. Apple, I would rather not use a PC! But if you won’t even let me pay for the option of expedited repairs, and want to keep hundreds of spare iPods and iPhones on hand instead of a few monitors for laptop repair, I have no choice.

It may be a while before I post again– it’s moving time! And the new laptop is something like six weeks away.

fun with python modules

New scripters I speak with don’t often know how to easily load code from external folders / modules in Python scripts. Today’s post will give you a few pointers in both Cinema 4D and Maya.

Setting Your Script Paths

Python’s import command should be no stranger to you if this topic interests you– it was probably the second thing most people learn in Python, after writing “Hello, World!” to the console. Import allows you to bring in code from libraries external to the source file in which you’re currently working. For example:

# commonly seen in Cinema 4D
import c4d
from c4d import *

# commonly seen in Maya
import maya
from maya import cmds as mc
import pymel.all as pm

These statements bring whatever module you specify into the current namespace, or bring in functions, classes, and variables. But where are the libraries that the import method references? Where do they live on disk?

The easiest way to find out is to list Python’s sys.path:

import sys
print(sys.path)

In my case, in Maya, it outputs the following:

[
'/Applications/Autodesk/maya2012/Maya.app/Contents/MacOS',
'/Applications/Autodesk/maya2012',
'/Users/Carney/scripts/mayaScripts/scripts',

...

u'/Users/Carney/Library/Preferences/Autodesk/maya/2012-x64/prefs/scripts',
u'/Users/Carney/Library/Preferences/Autodesk/maya/2012-x64/scripts',
u'/Users/Carney/Library/Preferences/Autodesk/maya/scripts'
]

Looking in the folders that are listed, you may find any number of Python source files and Python object files (*.pyc). sys.path is great because it’s just a regular Python list, which means it’s editable. You can append any number of paths that you like to it, and when import is called it will look through each and every path for the name specified.

Let’s try this in Cinema 4D. First, make a folder somewhere on your machine. I’m going to use /Users/Carney/Desktop/scripts for this example (I’m on a Mac.) In that folder, create a new file called util.py and add the following text:

# util.py
# simple utility functions

def ut_log(*args):
    msg =''
    for arg in args:
        msg += ' ' + str(arg)
    print(msg)

Now back in Cinema 4D, open the Console and the Script Manager from the Scripts menu. In the Script Manager, paste the following and hit Execute, replacing the path with the folder you chose above:

import sys
sys.path.append('/Users/Carney/Desktop/scripts')

import util
util.ut_log('Fun', 'Bunnies', 'are', 'fun.')

If all’s well, you should get a single sentence printed to the console output. If you made a mistake, you may get an error about not being able to import the util file. Check your path and try again.

With this setup, you can write scripts in your application that reference lengthy libraries of external code or other utility functions that you’ve created. At the moment I’m organizing code into single files with multiple functions for shorter utilities. Any function that’s more complex gets it’s own file and a class to contain it. This leads to funny lines like the following:

import module_generic
mod = module_generic.GenericModule()

But the organization and the ability to quickly update code without having to sift through a monolithic file inside the C4D Script Manager is worth the headache.

Automatically Adding Python Search Paths in Maya

The only thing to remember about this setup is that you have to make sure you add that folder you created to sys.path every time your application starts. In Maya this is a simple and well-known trick, but I had to do some digging to find out the same for Cinema 4D.

In both applications there’s a special Python file that gets loaded every time the Python VM restarts. In Maya, the file is called

Automatically Adding Search Paths in Maya

and it must live in one of three places:

  • ~/Library/Preferences/Autodesk/maya/2012-x64/prefs/scripts
  • ~/Library/Preferences/Autodesk/maya/2012-x64/scripts
  • ~/Library/Preferences/Autodesk/maya/scripts

You may notice that these are listed in the above printout of sys.path. When Maya starts it will execute userSetup.py files it finds. If you put the userSetup.py file in a folder that has the version of Maya specified (for example, in maya/2012-x64/scripts), then only that version will load the userSetup. If you place it in the general scripts folder — the last folder listed above — then it will be loaded by all Maya versions that support Python.

You can also use the MEL command internalVar -usd to find a folder that will work.

The userSetup file can execute any code you like when Maya loads, allowing you to have custom menus auto-created or to modify your sys.path variable so that you can access your code at any time. Try this: save a userSetup.py file into , and make sure it contains the following (after modifying the path to point to where you saved your util.py file):

import sys
sys.path.append('/Users/Carney/Desktop/scripts')

Now in Maya, open the script editor and copy, paste, and run the following:

import util
util.ut_log('Fun', 'Bunnies', 'are', 'funner.')

If all worked, you’ll see a line printed from your userSetup.py file letting you know that the custom setup succeeded on Maya startup, and you’ll see the proper output from this file.

Automatically Adding Python Search Paths in Cinema 4D

The way to do the above in Cinema 4D seems to be less well-known: you have to find the folder that is appropriate for your particular version of Cinema 4D and copy in a file called python_init.py.

The easiest way to find this folder is to go to the Scripts menu and choose User Scripts > Script Folder. This is the folder where scripts you’ve edited and saved through the Script Manager live. Now, go up one folder to Library, then go up again. This is the main folder for your version of Cinema 4D; it may have an oddly long name, but it contains your prefs and libraries. The python_init.py file belongs in prefs/python. As an example, my python_init.py folder is:

  • /Users/Carney/Library/MAXON/Cinema 4D R13/prefs/python/

Final Notes

This is just the start of organizing your code. If you want to know more, I recommend reading the official documentation on Python modules.

Tags: , , ,

maya input mapping for blender

A friend and fellow Blenderhead, Rob Garlington, spent a great deal of time working on an input remapping for Blender 2.5. What’s neat about his solution is that he’s also gone in and remapped the mouse inputs with the keyboard, so users coming over from Maya will really have a much easier time selecting objects or components and getting around the scene in general.

He doesn’t have a website set up yet, so I’ve offered to host his file here. It requires and has been updated for Blender 2.59.

After the download link, I’ve posted notes on usage from his email.

Download: Maya Input Remapping for Blender 2.59 (724kb)


Install:

The easiest way to install is to open this startup file in Blender 2.59, then go to ‘file\user preferences’ go to the bottom of the preferences screen and click the ‘save as default’ at the bottom. And that’s it, all the keys have been loaded into blender so that when you open any new scene it will use my key setup. If you ever want to go back to blender default simply click ‘file\load factory settings’.

Notes:

  • One thing to note despite my many changes to animation there was no option to deselect keys by simply clicking on blank space in the f-curve editor. So just press ‘A’ to deselect everything that way.
  • Most default blender settings that have been changed to accommodate this new setup usually require a ‘shift’ to work now. For instance to extrude a face press ‘shift e’ to work now.
  • Animation Changes:

  • ‘left click drag’ to marquee select keys
  • ‘middle mouse button’ moves the keys
  • ‘right click mouse’ will scrub the dope sheet and f-curve editor.
  • ‘s’ set to insert keyframe
  • ‘ctrl + alt + left mouse’ button for border zoom
  • ‘f’ will view all
  • ‘alt + right mouse drag’ for view zooming
  • ‘alt + middle mouse’ to move all 2d screens
  • ‘k + left mouse’ to scrub timeline in 2d screens
  • ‘, .’ goes to next or previous keyframe
  • ‘alt , or .’ goes to next or previous frame
  • 3D View Changes:

  • ‘left click drag’ select
  • ‘middle mouse button’ moves everything
  • ‘f’ will view selected
  • ‘left click’ outside of the object, deselects in object, edit mesh and pose mode
  • ‘spacebar’ brings up the dynamic spacebar menu
  • ‘right click’ (in edit mesh mode) brings up the mesh selection of faces/verts/edges
  • ‘4,5,6’ are mapped to the corresponding shading modes
  • ‘ctrl d ‘ duplicates objects/faces and everything else in Blender that can be duplicated
  • ‘g’ for repeat action
  • ‘shift + LMB’ will add more objects/verts/faces/edges to your selection
  • ‘ctrl + LMB’ will deselect objects/verts/faces/edges
  • ‘shift right click’ for 3d cursor placement
  • ‘shift space’ for search
  • ‘z’ also does an undo function in addition to the standard ‘ctrl z’
  • ‘ctrl + right click’ will enable lasso mode.
  • ‘alt + s and r’ go into scale and rotation mode
  • ‘ctrl + alt + s,r or g’ have been changed to clear the scale rotation or translation on any given object.
  • ‘y’ will bring up a special material selection toolbox.
  • Timeline:

  • ‘left click drag’ to scrub the main timeline
  • Things that remain the Blender default:

    Get used to using ‘a’ to either select or deselect everything as it is Blender’s default. UV view remains mostly the same as before.

    Tags: ,

    batch wrangling part 2 – Maya 2012 Human IK

    The second half of the work I did was to automate the process of moving data around between Motion Builder and Maya, and to make tools for the animators that lightened their loads when it came to exporting and retargeting animations. I was also responsible for a batch conversion pipeline.

    On the project there were animations in Motion Builder FBX files that were intended for reuse, which meant loading and retargeting multiple animations across multiple characters. This is a case (if only minimal edits are required) where the HIK system in Maya can be used to blast through conversions and free up animators for other work. Also, as many of the original animations were in single FBX files as Takes and the new decision was to have one file per animation (allowing multiple animators to work on the same character without file collisions in the version repository), the multi-take Motion Builder FBX files would need to be split in batch.

    The Maya Human IK system as of Maya 2012 is usable and has a lot of good benefits. Much of what they say works out of the box really does, provided you stick within the system: the ability to retarget animations between characters of differing sizes and joint placements works very well, and the fidelity of those animations stays high. If you rename or reorient bones but still have a Characterization in place for both characters, the transfer will still work out. However, there were also significant downsides:

  • The Motion Builder to Maya one-click scene send did not work as expected 100% of the time. When transferring from Motion Builder to Maya, I often found that while the Characterization would transfer over the rig itself would not be properly connected, and many times did not even come in at the right position in the Maya scene. Baking the keys down to the skeleton, transferring, and regenerating the rig on the Maya side does work. You lose the editability of having less keys, but you get a one-to-one transfer between the two programs this way and the Characterization makes rebuilding and rebaking the keys to the rig a one-click process.

  • On the Maya side you lose a lot of the features you’d expect. For example, the animators complained about not having foot roll controls. Regular Maya constraints don’t behave the same way you’d expect, and adding onto an HIK rig can be trickier than building on top of a regular Maya rig. The strangest thing was that you can’t zero controls. If you want to return to the “stance” pose, you have to change the input to the skeleton, then key the rig at the frame you want to have zero’d, and finally go back to having the rig control the skeleton. Editing curves on the HIK rig can be frustrating, as both the FK and IK objects are used to control the final position of joints and the different Human IK modes for posing and interaction pull at the body parts in different ways; often animators were baffled about which controls were causing jitters or other issues, and it was usually a control for a body part much higher up the hierarchy. Lastly, the HIK controls and skeleton don’t have the same orientations as the bones they’re based upon. If you’ve set up your skeleton in Maya properly with behaviour-mirrored arms and legs, you’ll find that you have to pose HIK-rigged characters’ limbs separately anyway. (I only had time to look into these issues for a moment, as I had a lot on my plate; if there are easy solutions that were overlooked I’d love to know what they are.)

  • I had a look at the system and the commands it used when I walked through the Characterization and retargeting processes, and determined at the time that Python was not the way to go for the retargeting pipeline itself. I found in tests that it was more work to get the MEL functions behind the HIK system working from Python than it was to write MEL wrapper functions and call out to them from Python when necessary. It was also more efficient to use the MEL functions as they were, as opposed to pulling them apart to find the necessary node connections to set up the system on my own.

    There’re a few lists of functions available online already (as I discovered on [insert blog link]). Here’re the ones I ended up using.

  • HIKCharacterizationTool, HIKCharacterControlsTool — These bring up their respective windows / docked panels. I found that not having the relevant window open made the functions that depended on the window being open fail, so keep that in mind when running HIK commands in batch.

  • getCurrentCharacter() — Returns the name of the current character as a string.

  • hikBakeToSkeleton — Bakes the keys from the rig or from another character being used as a retargeting source to the skeleton. I used this function when exporting from Maya to the game engine.

  • characterizationControlRigDelete() — Completely removes the control rig from the scene and sets the source for the character back to its skeleton.

  • setRigLookAndFeel(name, look number) — There are a few different looks for HIK rigs. In batch I found it nice to set the one I preferred before saving files out for animation fixes.

  • mayaHIKgetInputType — Returns 0 if input type is Stance Pose, 1 if input type is skeleton or control rig (I guess this means “self”), and 2 if input is another character.

  • mayaHIKsetCharacterInput(character, input character) — For retargeting, allows you to set the input of one character to be another in the scene.

  • characterizationCreate() — Creates a new Characterization node. You can rename the node and then make the UI recognize the new name with the following command.

  • characterizationToolUICmd — Useful for setting the current character name: characterizationToolUICmd -edit -setcurrentcharname [name]

  • setCharacterObject(object name, character name, characterization number, 0) — I don’t think I’ve seen this documented elsewhere, but this does the connecting during the Characterization phase from your joints into the character node. It appears the connections are specific and need to be fit into particular indices in a message attribute array, so the “characterization number” is something you need to figure out ahead of time if you’re doing a large number of these in batch. Some important numbers:

    Ground 0
    Left Thigh 2
    Left Calf 3
    Left Foot 4
    Left Toe 118
    Right Foot 7
    Right Toe 142
    Right Calf 6
    Right Thigh 5
    Pelvis / Center of Motion 1
    Left Clavicle 18
    Right Clavicle 19
    Left UpperArm 9
    Left Forearm 10
    Left Hand 11
    Right UpperArm 12
    Right Forearm 13
    Right Hand 14
    Neck Base 20
    Head 15

    The nice thing about this is that once you know all the numbers, you can slide them into attributes on the joints in your skeleton and use that data to apply characterizations later on.

  • Going forwards, if I were to use the same tools again in another production (and in cases where animation needs to be transferred between two differing skeletal hierarchies, it would make sense), I think I’d pull the code apart a bit more and have a look at how the connections are made at the lowest level, then rewrite a chunk of this code in Python.

    One more thing: using the standard functions, sometimes the UI will take a bit to catch up. Unfortunately, this means that functions which take inputs from the relevant UI will fail in situations where running them manually will work fine. EvalDeferred didn’t fix this issue for me every time, possibly because of how Qt and Maya are connected together and how they both do lazy updates at different times. I haven’t delved much into PyQt and Maya’s Qt underpinnings just yet, but the updating behavior is something for further study. In the interim, I found that using the maya.utils.processIdleEvents function to make sure all events were taken care of after doing major steps in the characterization or baking processes helped the UI catch up.

    Tags: , , , , ,

    batch wrangling – FBX

    At work we’re moving from a MotionBuilder pipeline to Maya, which I’m responsible for creating. One of the tasks on the list I was handed was to move animated takes out of MB and into Maya so that all exported files can be run through the same export steps, and also so that moving forwards animators would have the same tools for working on older animations as they will on files using my new rig.

    I have Maya Creation Suite 2012 on my work machine, which is touted as being able to seamlessly transfer data between the included apps– Maya, MotionBuilder, and Mudbox. I haven’t had need to open Mudbox yet, but in my limited testing so far the Human IK rigs never come through properly from MB to Maya and on the Maya side the HIK characterization gets broken. This means that to do any animation fixes or retargeting inside Maya, the characterization needs to be deleted and rebuilt. Also funny: the automatic naming templates in Maya don’t always work, making recharacterization a tedious manual process. Keyed transforms (joints, etc.) and meshes come through just fine, however, with all skinning and materials in tact. Updating previously-sent objects did not.

    Apart from all that, the first file I’ve been working on has 50 animations in it. I didn’t relish the idea of converting all of them by hand, so I set about seeing what’s possible on the scripting side.

    The FBX import/export plugin comes with a number of commands for massaging how files are read in. A full list of the commands is on Autodesk’s site. Note that the Python versions of these functions fail; I think they’re being generated improperly at plugin load. Could be that I’m just not calling them properly; I didn’t bug-hunt because I found doing the HIK post-import steps didn’t work in Python, either.

    I’ve written more MEL in the last two days than I have in the last four years, not that it’s a lot of code!

    The important commands for what I needed are:

    FBXRead -f [filename] — Doesn’t do any loading. Instead, it sets the specified file as the source for all queries.

    FBXGetTakeCount — Self-explanatory; on the file I was editing it returned 50.

    FBXGetTakeName [index]: returns the name of the take for a specified index. The indices are 1-based. I saved all of these in a string array.

    FBXImportSetMayaFrameRate -v [true|false] — Important in my case because the animation was all at 30 frames per second, while Maya is usually set to 24.

    FBXImportFillTimeline -v [true|false] — Makes sure the timeline length matches the length of the imported animation (although see below for a gotcha)

    FBXImport -file "c:/myfile.fbx" -t [take index] — Does the actual loading of the scene. By specifying a take index, you can be sure to get only the animation you want.

    With this information, I was able to loop through the animations in the FBX and, after a bit of post-import processing, spit out a series of .ma files.

    There were few gotchas. One problem was that while the script was running, sometimes the setting for having the FBX file’s time length override the same in Maya would get truncated– the animation length got set but the [bar that shortens the animation] would get set to half the length. I couldn’t replicate the issue running the MEL script in small chunks. A call to playbackOptions in my loop fixed this, but it’s still weird.

    Part two of this discussion will be about man-handling Maya’s Human IK in a batch process.

    Tags: , , , ,