Archive for category blender

normals display in blender 2.6x

I was working on a simple mesh in Unity in Blender 2.65a and I could not for the life of me remember how to show normals (to find some flipped normals that were causing faces to show improperly). Some spots say that the normals are displayable from the N-Key panel in the 3D view, but I thought a more concrete bit of information in order.

First, the normals are only displayed in edit mode. While in edit mode, if you mouse over the 3D viewport and then press the N-Key, you should see buttons appear in the N-Key panel under the Mesh Display category. Pressing one of those buttons will either show vertex normals or face normals, respectively.
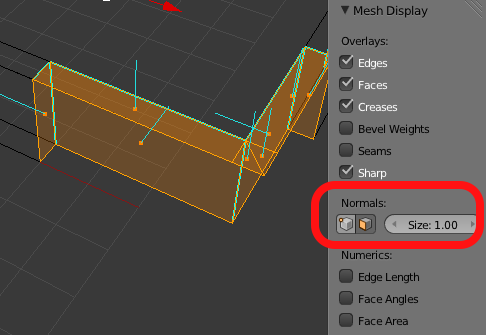
The Mesh Display buttons that appear in edit mode.

Nice thing about Unity is how it updates; I love that saving over an old FBX file will replace every instance of the mesh in scene prefabs, provided you haven’t done anything wacky. One save and all the normals get set to where they need to be. Not to mention, the Unity 4.0 interface upgrades are a great addition!

Tags: , , ,

maya hotkeys for Blender 2.61

Rigging Dojo Link! The interest was in the Maya hotkeys for Blender. It’s funny because earlier in the week I had a discussion with a coworker about how hard learning Blender is for users of other software.

I’ve had a newer version put together by the wonderful and talented Rob Garlington sitting in my inbox for the past few months, but between moving across town, starting a new job, and getting engaged, I’ve been very lax in blog updates. For the interested, I’ve posted his updated file here:


Blender2MayaHotkeys_2.61.zip


It’s a shame that Rob’s setup can’t be added to the main Blender distribution; I think that having “familiar” hotkeys and navigation would go a long way towards swaying users of other packages to give Blender a try and show them that integrating it into any pipeline has its benefits. (I put quotes around “familiar” because the only software I’ve been using longer than Blender is Lightwave, so Blender’s hotkey setup has always made sense to me.)

The following are Rob’s installation notes.


Install (Note this has only been tested on Windows 7)

Full Functionality Install: (to fully take advantage of the keymap changes)

  1. Start Blender and open the ‘startup.blend’ file included in the ‘Blender2MayaHotkeys_2.61.zip\config’ folder. Then go to ‘file/save user settings’ (or press ctrl + U) to save this file as the default scene, then close Blender. (This will setup a special directory under your ‘Users’ folder.)
  2. Go to the folder C:\Users\’your name’\AppData\Roaming\Blender Foundation\Blender\2.61 (note that the ‘AppData’ directory may be hidden, but it is there nonetheless and you’ll need to unhide it). Extract the contents of the Blender2MayaHotkeys_2.61.zip archive into the 2.61 folder (overwrite files as necessary).
  3. Open Blender again and it should all be setup. To ensure it’s working, if you go to the ‘Input’ tab under ‘file/user preferences’ you should see that ‘Maya Advanced’ is loaded into the filter section.

Partial Functionality Install: (Some mouse selection features are missing with this method)

  1. Simply open the startup.blend included in the ‘Blender2MayaHotkeys_2.61.zip\config’ folder. Then go to ‘file/save user settings’ to save the scene as the default.

maya input mapping for blender

A friend and fellow Blenderhead, Rob Garlington, spent a great deal of time working on an input remapping for Blender 2.5. What’s neat about his solution is that he’s also gone in and remapped the mouse inputs with the keyboard, so users coming over from Maya will really have a much easier time selecting objects or components and getting around the scene in general.

He doesn’t have a website set up yet, so I’ve offered to host his file here. It requires and has been updated for Blender 2.59.

After the download link, I’ve posted notes on usage from his email.

Download: Maya Input Remapping for Blender 2.59 (724kb)


Install:

The easiest way to install is to open this startup file in Blender 2.59, then go to ‘file\user preferences’ go to the bottom of the preferences screen and click the ‘save as default’ at the bottom. And that’s it, all the keys have been loaded into blender so that when you open any new scene it will use my key setup. If you ever want to go back to blender default simply click ‘file\load factory settings’.

Notes:

  • One thing to note despite my many changes to animation there was no option to deselect keys by simply clicking on blank space in the f-curve editor. So just press ‘A’ to deselect everything that way.
  • Most default blender settings that have been changed to accommodate this new setup usually require a ‘shift’ to work now. For instance to extrude a face press ‘shift e’ to work now.
  • Animation Changes:

  • ‘left click drag’ to marquee select keys
  • ‘middle mouse button’ moves the keys
  • ‘right click mouse’ will scrub the dope sheet and f-curve editor.
  • ‘s’ set to insert keyframe
  • ‘ctrl + alt + left mouse’ button for border zoom
  • ‘f’ will view all
  • ‘alt + right mouse drag’ for view zooming
  • ‘alt + middle mouse’ to move all 2d screens
  • ‘k + left mouse’ to scrub timeline in 2d screens
  • ‘, .’ goes to next or previous keyframe
  • ‘alt , or .’ goes to next or previous frame
  • 3D View Changes:

  • ‘left click drag’ select
  • ‘middle mouse button’ moves everything
  • ‘f’ will view selected
  • ‘left click’ outside of the object, deselects in object, edit mesh and pose mode
  • ‘spacebar’ brings up the dynamic spacebar menu
  • ‘right click’ (in edit mesh mode) brings up the mesh selection of faces/verts/edges
  • ‘4,5,6’ are mapped to the corresponding shading modes
  • ‘ctrl d ‘ duplicates objects/faces and everything else in Blender that can be duplicated
  • ‘g’ for repeat action
  • ‘shift + LMB’ will add more objects/verts/faces/edges to your selection
  • ‘ctrl + LMB’ will deselect objects/verts/faces/edges
  • ‘shift right click’ for 3d cursor placement
  • ‘shift space’ for search
  • ‘z’ also does an undo function in addition to the standard ‘ctrl z’
  • ‘ctrl + right click’ will enable lasso mode.
  • ‘alt + s and r’ go into scale and rotation mode
  • ‘ctrl + alt + s,r or g’ have been changed to clear the scale rotation or translation on any given object.
  • ‘y’ will bring up a special material selection toolbox.
  • Timeline:

  • ‘left click drag’ to scrub the main timeline
  • Things that remain the Blender default:

    Get used to using ‘a’ to either select or deselect everything as it is Blender’s default. UV view remains mostly the same as before.

    Tags: ,